What is a contact us page?
A contact us page is a page on a website or blog that houses a form through which visitors can reach a publisher for inquiries or complaints. A contact us page form has three basic features which are: name, email, and message.
The name section is where the visitor will input his or her name and the email section is where the visitor will input his email and the message section is where the visitor will input complaints, suggestions, inquiries, and recommendations.
Importance of a Contact us page
HOW TO ADD A CONTACT US PAGE
The moment you open a new website there are certain features you need to add to your website especially when you intend to apply to google Adsense or Ezoic. some of the features that you need to have include: a privacy policy page, contact us, and terms and conditions. Learn how to build a free website in under 1 hour by clicking this video "link"
- login to your blogger.com
- Click on the layout on your dashboard as seen in the image below, next
- Click on add gadget as seen in the image below. Please ensure that you follow these steps closely. Next...
- Click on the contact form as seen in the image below.
- After clicking on the contact us form, ensure you turn off the "show this widget" button as seen in the image below, and click on save. Next....
- Click on pages(1) on your dashboard as seen below and then click on new pages(2). Next
- Type contact us under the title and Click on the pen "Icon" as seen below. Next...
- Switch to HTML view as seen in the image below.
- Next, delete the contents you see on the page after switching to HTML view
- Copy this code below and paste it on your contact us HTML page; you should have something like the image below
<div id="custom_ContactUsFromForBlogSpotBlogger" class="widget ContactForm">
<div class="contact-form-widget">
<p>Please fill in the form below to get in touch with us.</p>
<div class="form">
<form name="contact-form">
<p></p>
Your Name
<br>
<input type="text" value="" size="30" name="name" id="ContactForm1_contact-form-name" class="contact-form-name">
<p></p>
Your Email
<span style="font-weight: bolder;">*</span>
<br>
<input type="text" value="" size="30" name="email" id="ContactForm1_contact-form-email" class="contact-form-email">
<p></p>
Your Message
<span style="font-weight: bolder;">*</span>
<br>
<textarea rows="5" name="email-message" id="ContactForm1_contact-form-email-message" cols="25" class="contact-form-email-message"></textarea>
<p></p>
<input type="button" value="Send" id="ContactForm1_contact-form-submit" class="contact-form-button contact-form-button-submit">
<p></p>
<div style="text-align: center; max-width: 222px; width: 100%">
<p id="ContactForm1_contact-form-error-message" class="contact-form-error-message"></p>
<p id="ContactForm1_contact-form-success-message" class="contact-form-success-message"></p>
</div>
</form>
</div>
</div>
<div class="clear"></div>
<span class="widget-item-control">
<span class="item-control blog-admin">
<a title="Edit" target="configContactForm1" onclick="return _WidgetManager._PopupConfig(document.getElementById("ContactForm1"));" href="//www.blogger.com/rearrange?blogID=7382626776242903253&widgetType=ContactForm&widgetId=ContactForm1&action=editWidget§ionId=sidebar-right-1" class="quickedit">
<img width="18" height="18" src="//img1.blogblog.com/img/icon18_wrench_allbkg.png" alt="">
</a>
</span>
</span>
<div class="clear"></div>
</div>- Next, replace the blog id on the code which is highlighted black as seen in the image below with your own blog ID which is red as illustrated in the image below (your own blog ID is highlighted red in the image below)
- Next, click on update and click on view blog as seen below. Note when you click on update the page below appears the next step is to click on view blog.
- After clicking on view blog, scroll down to the end of your page and click on contact us.
- Finally after clicking on "contact us" you should have a contact us page that looks like this below.
Personal experience with google/ blogger hosted contact us page
What is a Security Cname Record
How to find your cname record if lost or deleted (Personal Experience Case study)
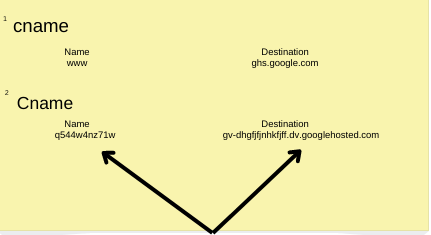
BONUS: BELOW IS A BRIEF DESCRIPTION OF HOW YOU CAN FIND YOUR CNAME : There is also an image visual that shows you what a cname looks like
Like me, if you need your security CNAME to add to a DNS maybe after altering your DNS settings mistakenly (like deleting the EDITABLE settings mistakenly), all you need to do is copy the URL below and ensure to replace the latter part of the URL (YourSweetDomainNameHere) with your own domain
https://www.google.com/webmasters/verification/verification?hl=en&siteUrl=https://www.YourSweetDomainNameHere.com
The image above (number 2) shows what to look for; you are looking for something that looks similar to what the arrow is pointing to. The first part of the record (q544w4nz71w) should be input under the name section and the second part (gv-dhgfjfjnhkfjff.dv.googlehosted.com) should be input under the destination section of your domain host. An example of a domain host is godaddy.com
BEFORE REPLACEMENT
https://www.google.com/webmasters/verification/verification?hl=en&siteUrl=https://www.YourSweetDomainNameHere.com
AFTER REPLACEMENT
It should appear like this e.g
https://www.google.com/webmasters/verification/verification?hl=en&siteUrl=https://www.profitnow.com
Next click on enter or search click on verify through domain name> scroll down and click on other, then click on " "add a Cname record" and your Cname should appear. it will look like the description above
Making money through email marketing requires that you make use of top-notch companies that provide the best email services.


0 Comments